A Kodi and Firestick combo is like BBQ Sauce and Kebabs, like Lays and Pepsi. It’s perfect. The Kodi gives you more variety, while the Firestick gives you peerless security and authenticity. You can watch thousands of shows without a hitch or hiccup. But how do you use a Kodi with Firestick and Fire TVs? What’s the installation process? And what can you do with it? We’ll answer all of these questions in the following guide.
We’ve divided our guide into four main parts:
- Description and Information.
- Installation of Kodi.
- Removing Kodi.
You can move to any section based on your needs and convenience. So let’s get to it!
What is Kodi?
When most beginners hear about Kodi, they probably associate it with a service that’s extremely difficult or confusing to comprehend, hard to use and set up. It’s sometimes even associated with a service that’s only created for tech buffs.
But that’s not true!
It’s one of the best and free open-source media players in the world that will make every streaming enthusiast’s dream come true.
Also, in case you’re wondering how to use Kodi or if it takes a while to set up, you should know that it’s extremely simple to use!
You’ll be able to access any and every kind of steaming service through something called a Kodi add-on. This is when there’s a particular movie, TV show, music genre or games, etc., not readily available for streaming on Kodi.
But, because Kodi can’t provide immediate access to every streaming platform, it’ll need the assistance of plugins, known as an add-on.
There are innumerable add-ons available for installation where you can stream movies, TV shows, and documentaries from popular platforms like Netflix, BBC iPlayer, Hulu, etc.
With Kodi, you’ll also be able to access builds, Kodi skins for user-friendliness, repositories, and more.
Kodi is compatible with many devices, just in case you have a preference. It works the best with Firestick, Android, iOS, Nvidia Shield, Xbox One, PS4, and Linux.
You’ll be able to sideload many Kodi-add-ons onto these devices through a method called sideloading.
How to use Kodi
Kodi is compatible with many devices. However, since Firestick is Kodi’s most popular option, we’ll cover that in our tutorial.
You’ll first have to learn how to install the app to use Kodi. Since the app isn’t available on the Amazon App Store, you must learn how to jailbreak your device.
This tutorial works on Kodi Matirx 19, Leia 18, the older version of Krypton 17.6, and even the newer v20.2 Nexus.
How to Install Kodi on Firestick
Since you’re here, you’re probably wondering what’s the installation process? Don’t worry, we’re here to help. You’ll first need to enable apps from unknown sources on your Fire TV and download the Downloader app in order to install Kodi. Here’s what you should do:
Enable the Apps from Unknown Sources
- Go to the settings menu on your Firestick and click on “My Fire TV” or “Device.”
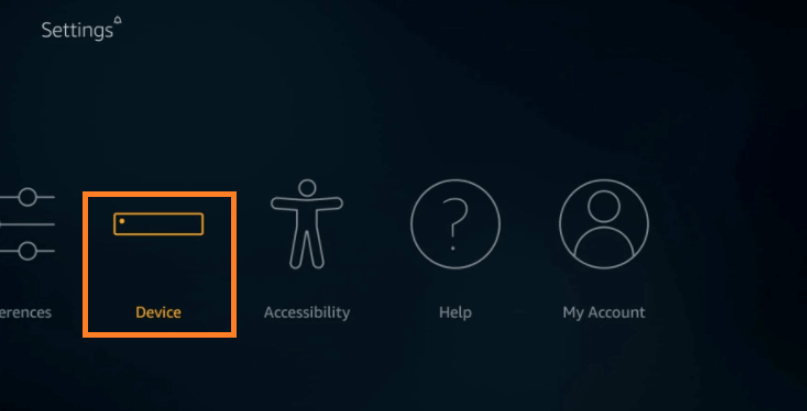
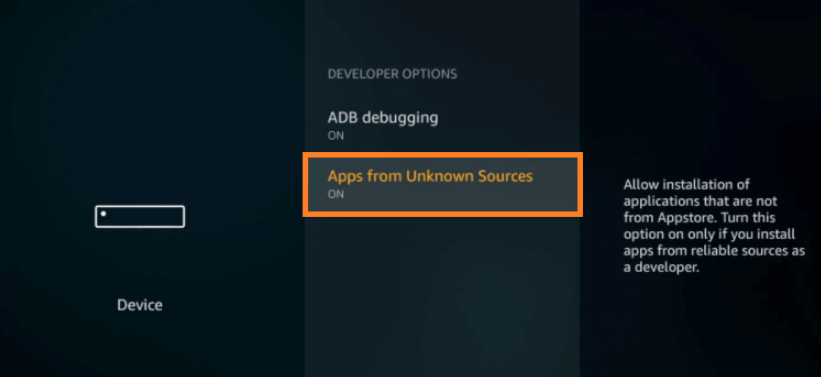
- You’ll see an option called “Developer Options”, go into it, and enable the “ADB debugging” and “Apps from Unknown Sources”
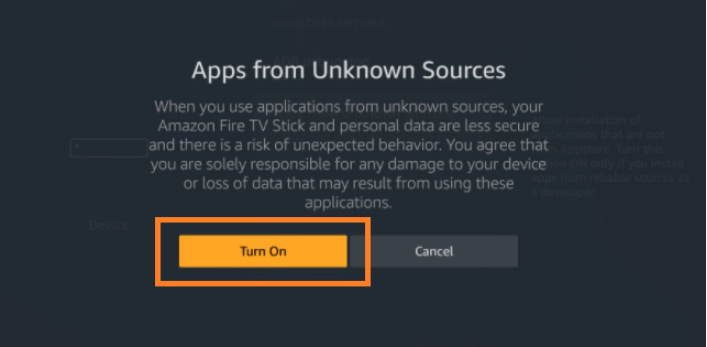
- You might be prompted by a pop-up warning, simply click on “Turn On” to continue.
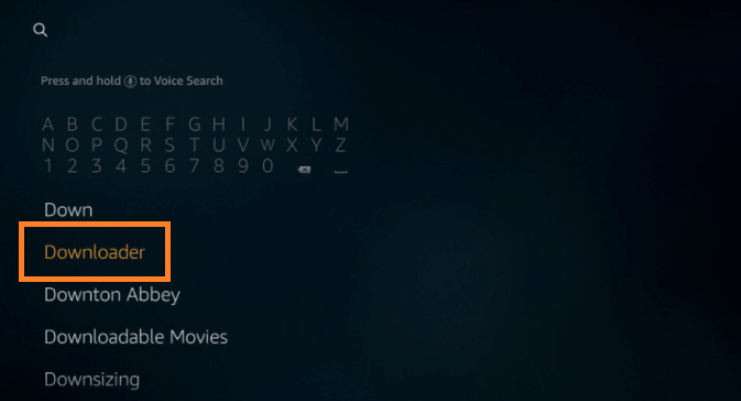
- Now, head back to the main screen and in the search bar, type in “Downloader”.
- Click on the download button or on Get.
- Once, the app has been downloaded and installed, click on “Open.”
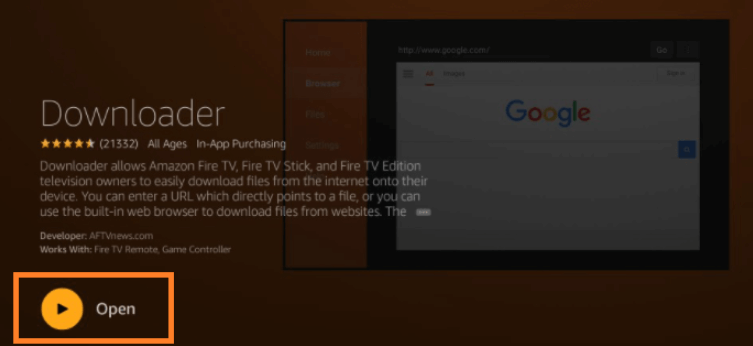
You’ve now got yourself the “Downloader” app. This will assist you to sideload any third-party APK files on your device. Now, you begin to jailbreak your device to download Kodi.
Jailbreak Firestick to download Kodi
- Launch the Downloader app, and you’ll see an empty URL tab. You should see “http://” by default.
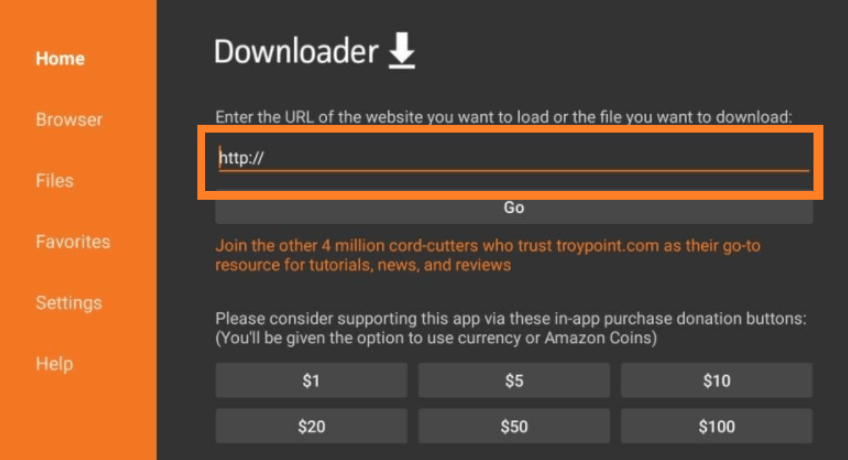
- Now, enter in the Kodi APK link “tv/download” to download the app and click on “Go.” Make sure you download the 32-bit APK file.
- The Kodi APK will now download.
- Once that’s done, approve the permissions by following the onscreen instructions, and then click on “Install.”
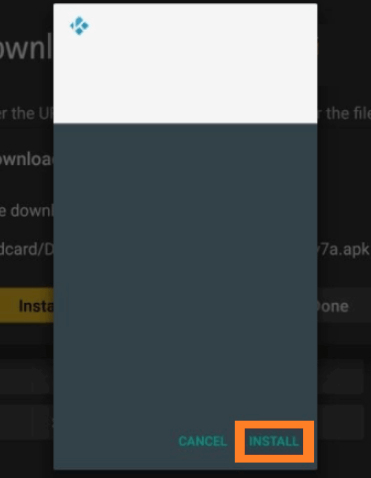
- That’s about it.
How to install Kodi on Firestick using AppStarter
If installing the Kodi APK file on Firestick does not work for you, there is another method you can use. The AppStarter app is perfect for downloading third-party apps, and happens to be great for Kodi on Firestick.
First, you will need to enable the Apps from Unknown Sources and download the “Downloader” app. The tutorials for both are found above. Then:
- Launch the Downloader app, and click on the URL box.
- Enter the URL for the AppStarter APK and then click on “Go.”
- When the AppStarter is downloaded, click on “Install.”
- Launch it.
- To first install Kodi, go to “Updates” in the left-side menu of AppStarter.
- Click “Install” on the right side where it says Kodi.
- That’s all!
If you already have Kodi on your Firestick, you should try updating it for better results.
How to install Kodi on Android TV
Installing Kodi on Android TV is simpler than installing and using Kodi on Firestick. The Kodi app version 20.2 Nexus is already available on the Google Play Store, so installing it shouldn’t be an issue. Here’s a quick tutorial showing you how to get started:
- Turn on your Smart TV or connect it to a TV using an Android Box.
- Go to the main screen and click on the Google Play Store
- Type Kodi, and you’ll easily find the app.
- Click the “Install” button and follow the onscreen instructions. You’ll have the Kodi app on your device in under minutes!
How to update Kodi
Most users are still utilizing the older Kodi app version. The previous versions can be buggy and may not work in some cases. For a smoother experience, we recommend updating your Kodi app to the latest version. As of now, in 2024, the latest version is Kodi v20.2 (Nexus). If you’re looking for ways to update Kodi on multiple devices, there’s a guide you can look into.
What is a Kodi add-on? How do we install it?
As mentioned above, Kodi is a media player. You can use Kodi to play music, movies, and TV shows from your local library. But what good is that when the content is limited? That’s where Kodi add-ons come in.
A Kodi is known for its personalization capabilities. And the best way to personalize a Kodi is through add-ons. Some Kodi add-ons give you links to multiple streaming platforms and a diverse array of content.
You might also face geo-restrictions on your Kodi device. Most users bypass these restrictions by loading add-ons onto Kodi.
Add-ons ranging from…
These add-ons are filled with numerous content from libraries comprising of:
- Movies
- TV shows
- Kid’s entertainment
- Sports
- News
- Music etc.
Since you’re a little acquainted with what a Kodi add-on is, now, let’s move on with a short tutorial on how to install it.
How to install addons on Kodi
There are hundreds of add-ons available, but only a few are the best for Kodi. You first need to decide what kind of content you need and then select an addon that offers it. Next, you find the source that offers the addon and then install it on Kodi.
The following tutorial will help you download any unofficial add-on onto Kodi in no time. But first, you need to enable the “Unknown Sources.”
Here’s how you start:
- Launch Kodi on your device.
- Now, click on the “settings” icon.
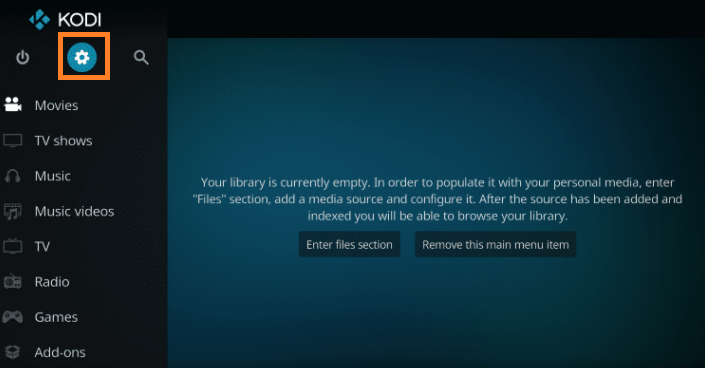
- Now, click on “System” to launch the settings.
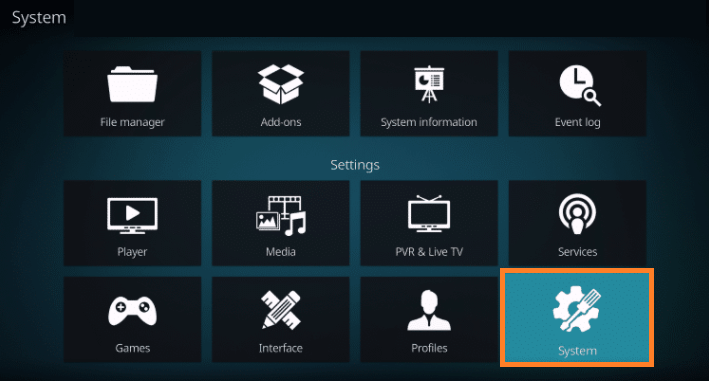
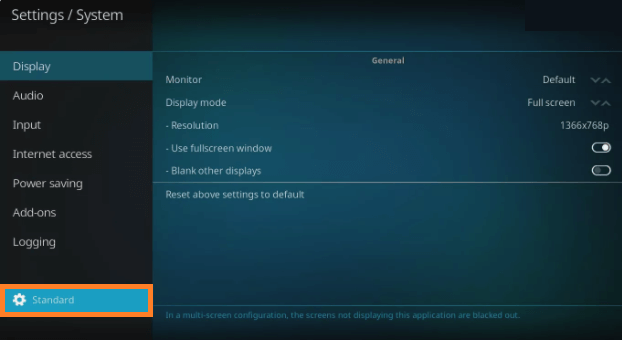
- On the left side of the menu, towards the bottom, click on “Standard” and switch it to Advanced.
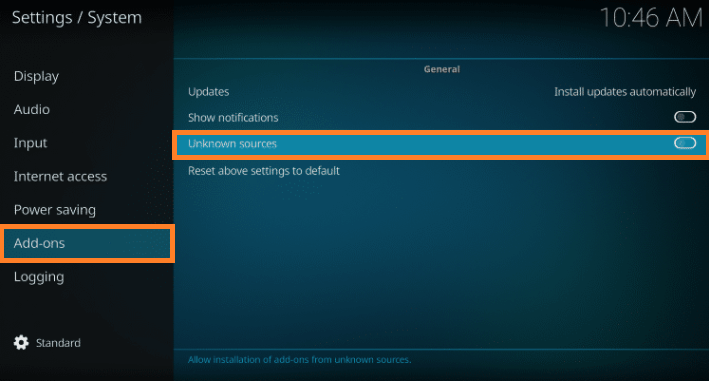
- Now, click on “Add-ons” and then enable the “Unknown Sources.”
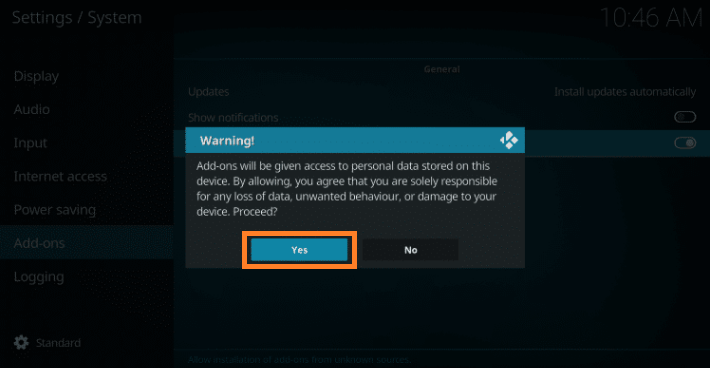
- You’ll receive a warning concerning the dangers of accessing add-ons through unknown sources. Click on “Yes” to continue.
- Now, to go back to the “System” page, click on the Esc key. Then, click on “File Manager.”
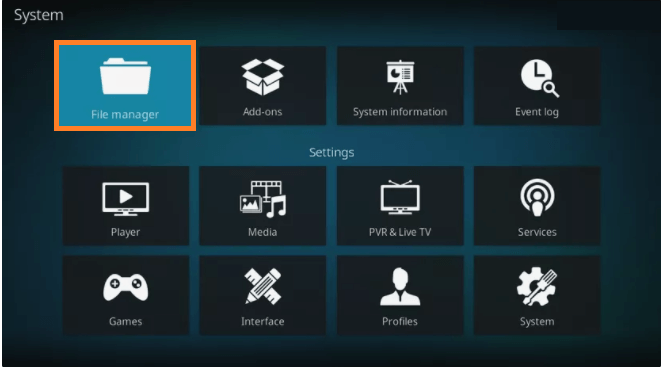
- Click on “Add source.”
- You’ll receive a pop-up window, select “None.”
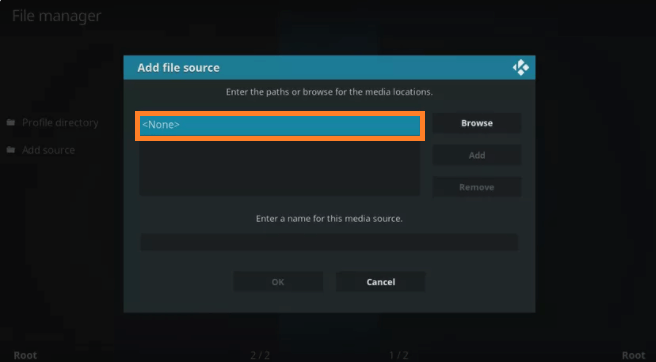
- Now, to download an add-on, you’ll first need to download the repository that contains it. Enter the repository URL in the path tab, and name it.
- Click on “OK”
- Return back to Kodi’s main screen by clicking on the keyboards Esc button. Click on “Add-ons.”
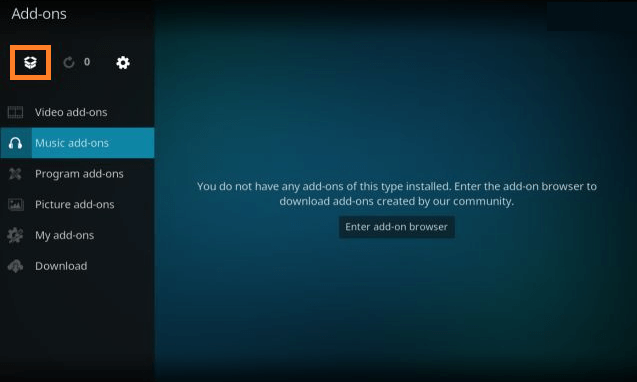
- You’ll see a package icon on the top left corner. Click on it.
- Next, click on, “Install from zip file.”
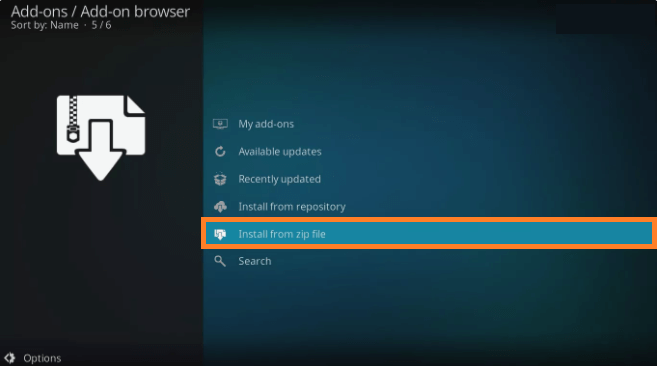
- Now, select the repository name that you created, and choose the .zip file that contains the repository you require to install.
- Once you’ve installed the repository, click on “Install from repository.”
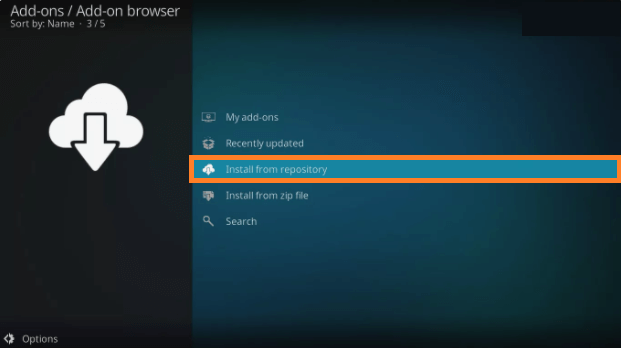
- Select the name of the repository that you just installed.
- When you click on it, you’ll see a list of categories, like music, games etc. Click on the category you require and then on the add-on you want.
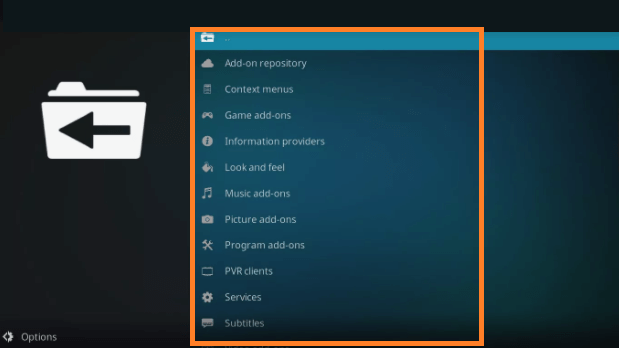
- Once you click on the add-on that you require, click on “Install” and then on “OK.”
- Wait for the add-on to install, and then return to the main home screen by pressing the Esc button.
- You should see the new and installed Kodi add-on.
How to use the add-ons
Now that you’ve installed your add-ons on Kodi, you need to learn how to use them. But first, do you know how to find them? If not, you’ll find a short tutorial below.
Secondly, all add-ons are different and will be found in their own categorical tabs. For instance, you installed an add-on for movies and videos, so, it’ll be found in the Video add-on section.
In the same way, if you’re planning on looking for your add-on for video games, it’ll be found under the Game add-ons. Since add-ons for movies, videos and TV shows are the most sought after, I’ll focus my tutorial around that.
So, here’s how to find the video add-ons:
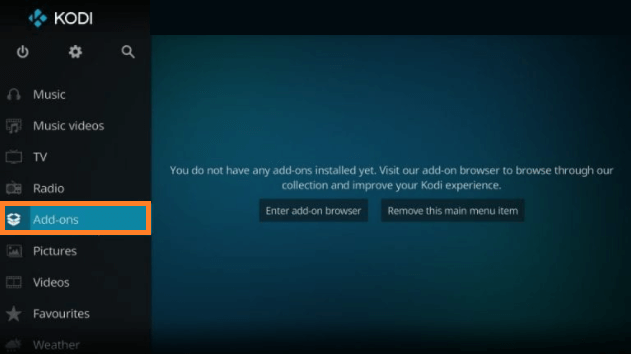
- On your home screen, click on “Add-on” on the left side menu.
- Click on “Video add-ons.”
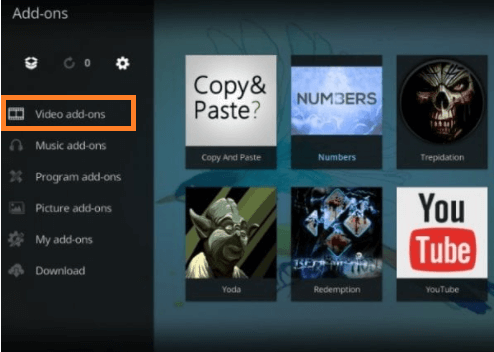
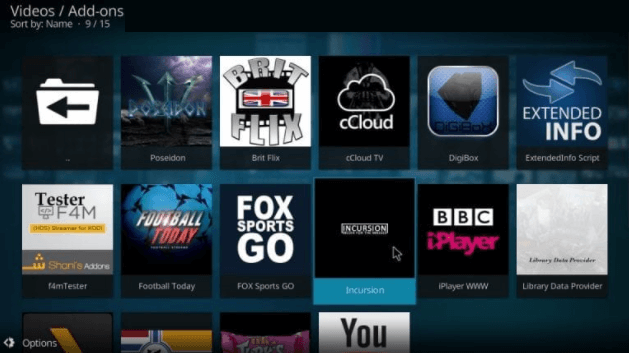
- You’ll see the entire list of streaming services that the add-on offers, like so:
How to use the addon
- When you choose the add-on you like, for instance, if you look at the image above, all you need to do is click once over any of them, and it’ll open instantly.
- Once you open the add-on, you’ll have another list of options to choose from, like Movies, TV shows etc. Click on “Movies” to access them.
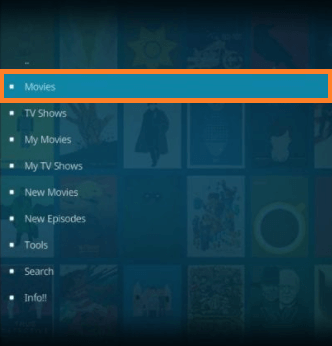
- Each add-on is different. For instance, when you choose a particular add-on, you might receive a list of sub-categories to choose from, like in the image above. Or, sometimes you’ll directly be lead into the movie titles.
- Once you click on the subcategory and then the title name, the add-on will then start scrapping the movie from various links.
- When that’s done, click on any of the links and start streaming!
What is a Kodi Build?
Kodi has a simple interface with a plain theme. This is called a Kodi skin, named Estuary. Sometimes that isn’t enough to pique your interest.
What if you want to change the way the app looks? Give it a makeover? You’ll have to use a Kodi build. A Kodi build is your one-stop shop to change the overall look of Kodi.
A Build comes with numerous pre-installed add-ons and skins for you to choose from, making Kodi a little more advanced and exciting overall.
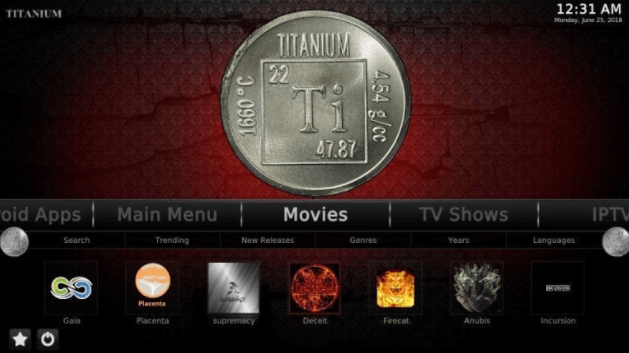
For instance, have you heard of the popular Titanium Build? Here’s what it looks like:
How to install a Kodi Build
There are quite a few Builds circulating the internet. However, not all builds are great for Kodi. We collected the best and most popular Kodi builds to make things easier. The Kodi builds that we selected are as follows:
- Titanium
- Misfit Mods Lite
- No Limits Magic
- Xanax
- Xontech
- Streamline
- One Nation Portal
To give you an idea of how to install a Kodi Build, follow this tutorial below on the most popular Titanium Build. Before starting, here’s what you need to note: The Titanium Build is a part of the Supreme Builds Wizard.
So, we’ll first need to install the Supreme Builds repository to get the Supreme Builds Wizard. Here’s what you should do:
Step 1: Supreme Builds Installation
- Launch the Kodi settings by clicking on the Cog icon, and then open the “File manager.”
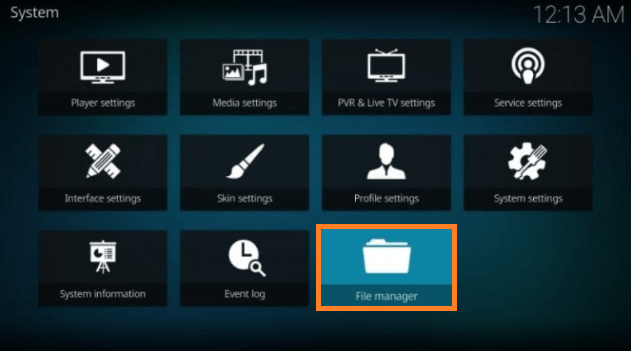
- Then click on “Add source”
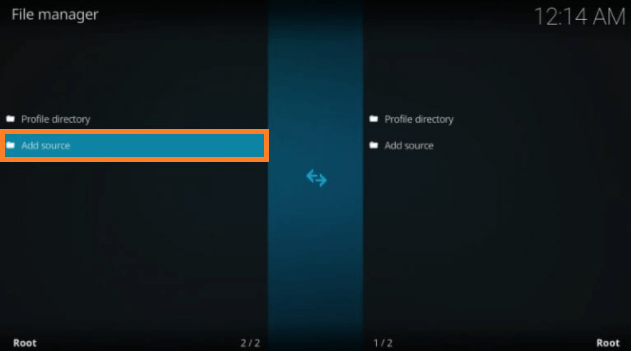
- Select “<None>”
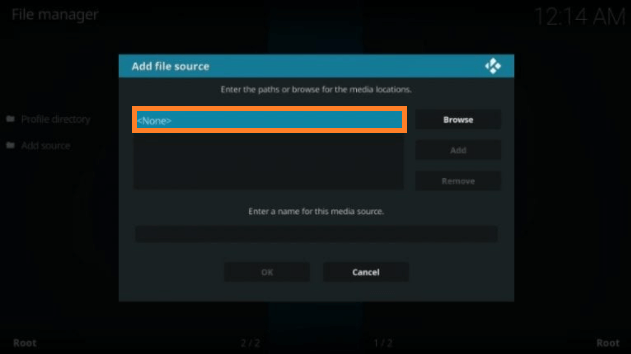
- Now, using the on screen keyboard, type in the URL “http://repo.supremebuilds.com/”
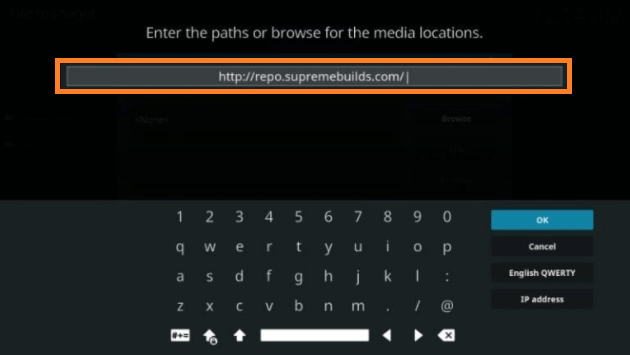
- Click on “OK”
- Head back to the home screen, and click on “Add-ons.”
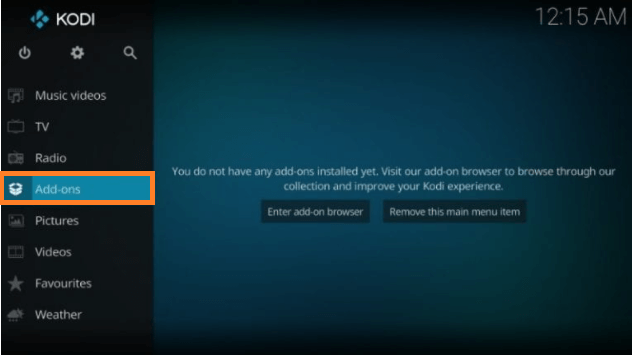
- You’ll see a package icon like shown in the image below. Click on it.
- Click on “Install from zip file”
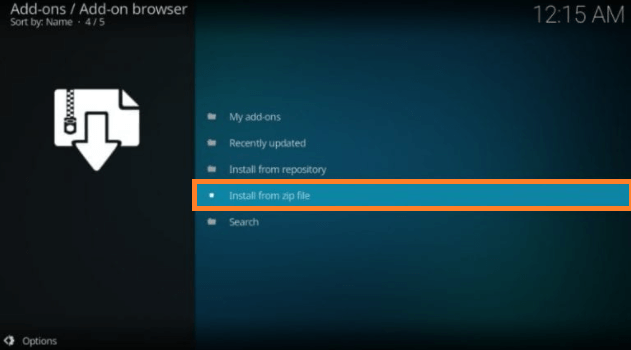
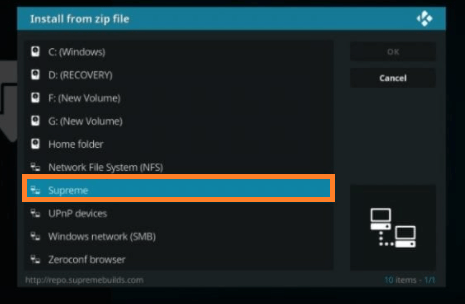
- Now, from the list, click on the name you gave for the media source. For example “Supreme” as shown in the image below:
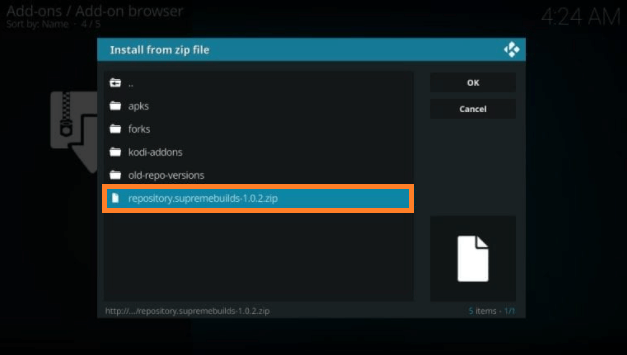
- Click on “repository.supremebuilds-1.0.2”, keeping in mind that it depends on the version you have.
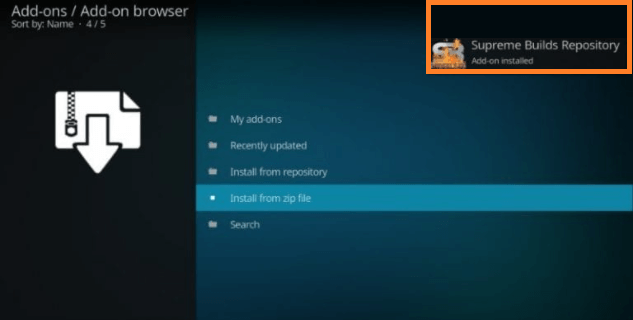
- Wait for the add-on to install. You should receive a notification, like shown in the image below:
- Now, click on the tab that says “Install from repository”, and click on “Supreme Builds Repository”
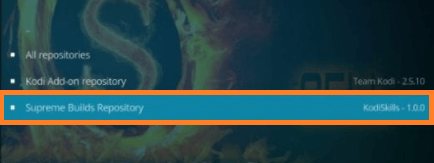
- Click on “Program add-ons”
- Then on “Supreme Builds Wizard”
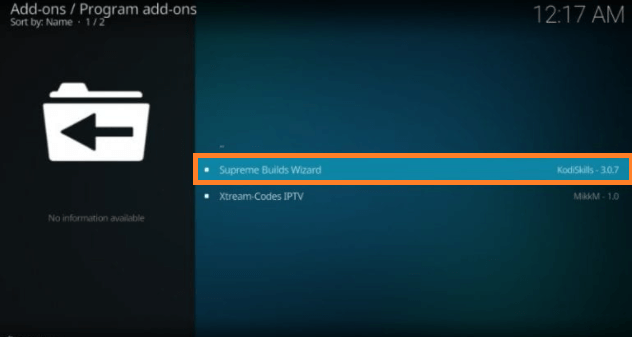
- On the bottom right of the screen you should see an “Install” button, click on it.
- Once this installs, you’ll again see a notification that says “Add-on installed”
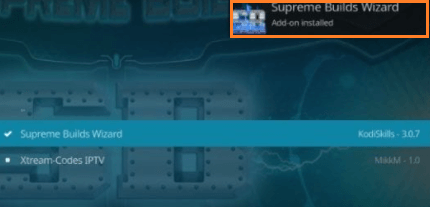
- Dismiss the pop-ups!
Step 2: Titanium Build Installation
- Now, that the repository is out of the way, head back to the Kodi home screen and click on “Add-ons”, and then on “Program Add-ons”
- Click on the build to run it!
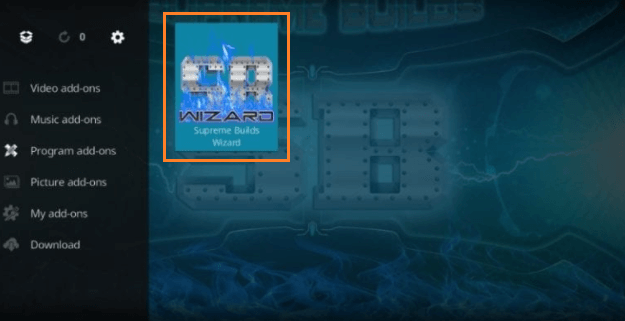
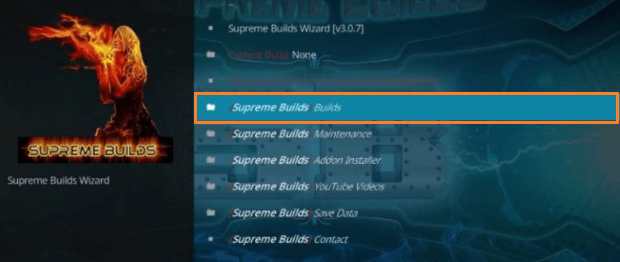
- There’ll be a list, click on “(Supreme Builds) Builds”
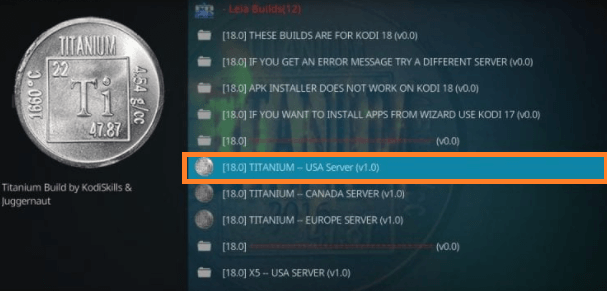
- You’ll see multiple servers. Click on the fastest one depending on where you’re located. Here’s a sample of the servers mentioned in the image below:
- Click on “(Supreme Builds) Fresh Install”
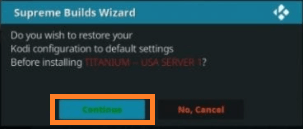
The fresh install wipes all the old Kodi add-ons clean and replaces it with Titanium Kodi Build. If you want to hang on to the old add-ons as well, then choose “Standard Install” instead of the fresh install option.
- Once you click on fresh install, there’ll be a dialogue box. Click on “Continue”
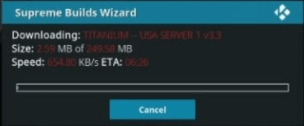
- The Titanium Build will now start to install. Here’s what it looks like:
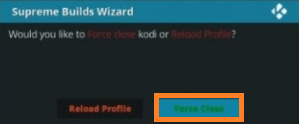
- After the installation, there’ll be another dialogue box, click on “Force Close.”
- That’s about it!
How to install a Kodi add-on on a Build
There are circumstances when the Build you install doesn’t come with certain streaming services, games, TV shows, music libraries that you require. So, you’re going to have to install an add-on on the Build you have installed.
For instance, we went through a Titanium Build tutorial above, but it might not come with the add-on you’re looking for. There is a way for you to add separate add-ons to your Kodi build, and here’s how:
- Choose any one of the best Kodi add-ons. I went with Genesis Reborn. And, since I’ve already covered a Titanium Build tutorial on top, we’ll keep the same theme flowing.
- Launch Kodi.
- Head to the home screen of Titanium Build, and click on “Main Menu” and then on “Settings.”
- You will receive a list of options, click on “System”
- You’ll be prompted with another window, click on “Add-ons” on the left side of the screen, and then enable “Unknown sources” from the Systems Settings list.
After this, the steps are the exactly the same as the tutorial on how to install a Kodi add-on, mentioned above. Just for a quick idea, here’s what you do:
- Insert the source URL to the Kodi build
- Install the repository for the add-on
- Lastly, install the add-on from the repository
Always use a VPN
Kodi is a third-party app, and many add-ons generate copyrighted content through torrent streams. This is why you need to use a VPN to protect your online activities and hide your physical location from the ISP and the government.
Secondly, Kodi might not be available from where you’re located. To access it, you must connect to a virtual VPN server of the country that permits access to Kodi.
Furthermore, a VPN protects you from unnecessary malicious ads and hackers. However, not all VPN services are reliable or work. We’ve shortlisted and tested a few of the best VPNs for Kodi. They are:
To conclude
Kodi is a great media player with limitless customization and entertainment opportunities. You can use different Kodi add-ons to get more content on your Firestick. The custom builds allow you to change the themes and functionality of your Kodi. And you can install all of these with ease. The tutorial above should help you get started immediately! But always remember that because Kodi is a third-party app. It could have vulnerabilities, so you need to use a reliable VPN like the 5 listed above when streaming on Kodi on Firestick!


