Learn how to update Kodi on Firestick and other devices to improve its overall performance of it. Other than that, because Kodi is a free open-source media player, we’ve recommended some of the best Kodi VPNs to use with it.
This tutorial works on older Kodi versions too. Let’s get started!
Overview
Kodi is one of the best and free open-source streaming services that allow you to download numerous Kodi add-ons. Kodi on its own heightens or enhances your streaming experiences on multiple supported devices.
However, for an even better experience, you’re going to need to know how to update Kodi to its latest version of Leia 18.9. Below you’ll find tutorials of Kodi updates on Firestick, Windows, Android, iOS, and macOS.
Before we skip to the tutorial, you first need to understand why we update Kodi.
Why do we update Kodi?
Kodi, with every new version, releases better updates and bug fixes. These updates won’t make any drastic changes to your pre-configured settings, nor will they let you lose access to any previously downloaded add-ons.
So, if you’re a Kodi user, you’re going to want to update to the Leia 18.9 on the following devices mentioned below.
However, since Firestick is the best streaming device for Kodi, we’ll start off with that tutorial first. I’ll also be highlighting an alternate Firestick tutorial to install the updated Kodi version through the ES File Explorer method.
Make sure you’re connected to a VPN!
Hold on! Before moving on to any updates, always make sure you’re connected to the best Kodi VPN! Kodi is a third-party app and needs to be accessed with the help of a VPN. It’ll help encrypt your online activities while downloading any APK apps or copyrighted content on Kodi.
Also, we at topvpnservice do not encourage the downloading of copyrighted content. So make sure you use Kodi wisely!
Here is a list of the best Kodi VPN services:
How to update Kodi on Firestick / FireTV
The following steps to update Kodi are the same on all second-generation Fire devices (Firestick, Fire TV Cube, and Firestick 4K).
Prep your Firestick
- Before starting the Kodi update, you’re going to need to prep your Firestick by tweaking it with a few settings.
- Go to your Firestick settings and click on “My Fire TV” or “My Device”
- Now, head to the “Developer Options” and enable the “Apps from Unknown Sources.”
- Go back to the Settings, click on “Preferences”, then on “Privacy Settings” and disable “Collect App Usage Data.”
Proceed to download the Kodi update on your Firestick
The latest update for Kodi is Leia 18.9, so, you’ll now have to install the latest version of the app on your Amazon Firestick device. To do that, you need to first download the “Downloader app” if you haven’t got it installed already.
Start by:
- Go to the home screen on your Fire TV and in the search menu, type in “Downloader” and click on the correct app, like so:
- Proceed to download and install the Downloader app. Once installed, click on “Open.”
- Launch the Downloader app, and in the URL section with http:// as default, enter the updated Kodi APK URL in the blank field and click on “Go.”
- Wait for the Kodi update to download on your Firestick device.
- Once it’s updated, click on “Install.”
- To confirm that the Kodi APK is installed, you’ll receive a pop-up message saying “App Installed.”
- That’s about it!
How to check if the latest Kodi update is installed
Once you’re done with the entire installation process, and just in case you need to know whether the installation APK was updated to Kodi Leia 18.9, head to your Kodi “Settings” and then on “System Info.” The latest updated version will be mentioned on the bottom right of the screen.
How to update Kodi on Firestick / FireTV using the ES File Explorer method
This method is only for those who aren’t able to update Kodi using the Downloader app due to certain restrictions. So, if that didn’t work, try out the ES File Explorer method.
The only downside to using this method? It’s no longer free! You’ll have to pay around $9.99/mo. to sideload apps through this program.
So, only if the Downloader app fails to work for you, should you use this method. Start by:
- Download and install the ES File Explorer app from the Amazon Store, the same way the Downloader app was installed in the tutorial above. Make sure the “Apps from Unknown Sources” is enabled. Once that’s done, proceed with the following steps.
- Launch the ES File Explorer app and click on “Download” found on the right side of the app.
- Now, click on “+New” and then enter the updated Kodi APK link in the Path Field and type any file name in the Name Field.
- Once that’s done, click on “Download Now” and wait for the APK file to download.
- Click on “Open File” and then on “Install.”
- Once installed, click on “Open”.
- That’s about it! Your Kodi app is now updated to Leia 18.9.
How to update Kodi (Leia 18.9) on Windows
The latest Kodi version released for Windows is now Leia 18.9. So, if you’re using the older version, here’s how you can update it:
- To replace the old Kodi version with the new, start by shutting off Kodi on your Windows device.
- Go to the Kodi website, where you’ll find a download link to the latest Kodi version.
- Click on the Windows icon, and select the “INSTALLER (32BIT)” version, like so:
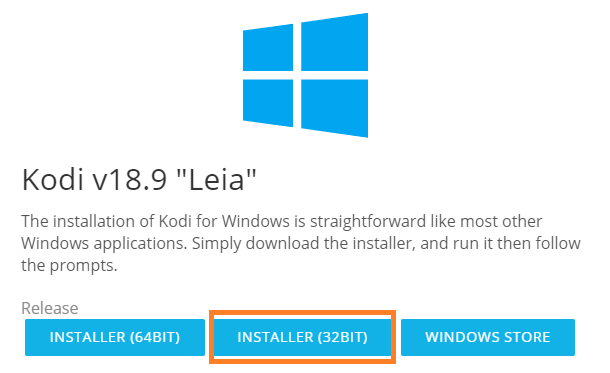
- Click on it, and the updated Kodi version will begin to download, like so:

- After the updated Kodi version is downloaded, launch the .exe file (Executer file)
- Follow the on-screen instructions to proceed with the rest of the installation process. During this process, you should receive an onscreen message saying that your current Kodi files will be replaced or overwritten.
- After the latest Kodi version is updated, launch the app on your Windows.
- Lastly, for a quick check-up, go through the app to check if all your previous settings, builds, add-ons, or skins are the same and untouched.
- That’s all!
How to update Kodi on Android (Smartphone)
To install the latest version of the Kodi app on your Android Smartphone is fairly easy. Here’s how you do it:
- First, either delete the old version of the app or head to the Play Store to install the updated version.
- On your Android smartphone or tablet, head over to the Google Play Store.
- In the search tab, type in “Kodi”
- You’ll find a number of Kodi dupes. The real Kodi app is under the name of “Kodi: created by the XBMC Foundation.”
- Click on it, and then on the “Install” button.

- Now, wait for the app to install.
- Once the updated Kodi version is downloaded on your Android smartphone, either launch it immediately or go into your phone’s app folder.
- That’s about it!
How to update Kodi on Android TV BOX / Android TV
Updating Kodi on Android TV is fairly easy since the app is available on the Google Play Store. However, just in case your model of the Android TV doesn’t come with the pre-installed Play Store app, you’ll probably need to sideload the Kodi update onto your device.
So, for those who already have access to the Play Store on their Android TV Box, follow the simple tutorial below:
- Power up your Android TV and head over to the home screen. Click on the “Google Play Store” or “Google Store” icon. If you have neither one of these options, click on “Apps”, and then find the old version of the “Kodi” app.
- Once you click on the “Kodi” app icon, it’ll re-direct you to its description page, where you’ll see an update button, if any is available.
- Click on the update button, and wait for it to install. That’s about it!
Updating Kodi on your Android TV is somewhat the same procedure and is pretty simple to do. All you have to do is:
- On the main home screen of your Android TV, head to the “Google Play Store.”
- Now, you’ll see a menu on the left side of the Play Store app, which has four options, “Home, Games, My Apps, and Settings”, like so:
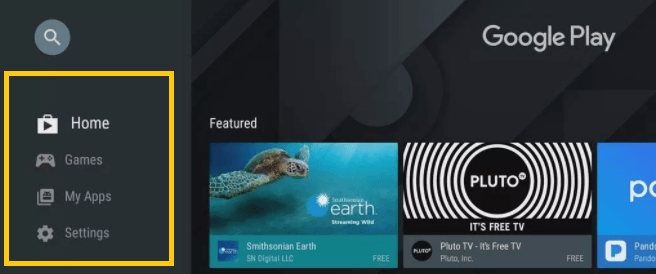
- Click on the “Settings” option and enable “Auto-Update Apps”
- Now, go back and click on “My Apps.”
- You should see a Kodi update available for the Leia V 18.9. Click on it and let it update.
- Once the update is installed, you’ll be able to access the updated and bug-free Kodi app from your home screen.
- That’s about it!
How to update Kodi on iOS (iPhone and iPad)
Updating the Kodi app on your iOS isn’t the same as the other tutorials on this blog. To update the Kodi iOS app, you’re going to first have to delete the older version. It might not be necessary, but it’s recommended. There’s good news though! These methods don’t involve jailbreaking your iOS – causing zero damage to your system!
Updating Kodi on iOS (without jailbreaking)
To install the Kodi Leia 18.9 update on your iOS, there are two versions you can use, one’s through:
METHOD 1: Via Cydia Impactor
To proceed with the tutorial make sure you have Cydia Impactor downloaded on either Windows, Mac or Linux. You’ll also need to have iTunes set up or installed on your computer, because we’ll have to pair it with your iOS device. Thirdly, make sure you have a paid Developer ID or an Apple ID. Now, start by:
- Launching the Cydia Impactor.
- Using an iOS cable, connect your iOS device to your computer.
- Now, head over to “https://kodi.tv/download” to download the iOS app from the Kodi website.
- You will automatically end up downloading a DEB file, but what you actually need is an IPA file for this method to work. If you need steps on how to convert the file, here’s a tutorial you can use.
- Once that’s done, drag and drop the Kodi file on the Cydia Impactor window.
- On the Cydia window, you’ll have a drop down menu to choose the device you’re using. Select it.

- Now, the app will ask you to enter in your Apple ID details to proceed with the Kodi reinstallation and update process.
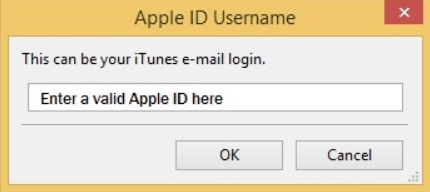
- Click on “OK.” Cydia Impactor will start installing the Kodi app on your iOS device. Once the installation is done, you’ll see the app’s icon on your device.
- Before you launch the app, disconnect your iOS device from the computer, and go into the iOS “Settings.”
- Click on “General”, then on “Profiles & Device Management” and then on “Apple ID” you used for Cydia.
- Click on the option that allows you to “Trust” the Apple ID you used for the installation, and then run the app.
- That’s about it!
METHOD 2: via Xcode
This method can only work with your iOS device and a macOS computer. Before starting, make sure you have iTunes, Xcode and the iOS App Signer installed. Also, please note that this method is a little more technical, so only proceed at your own risk. You’ll also need to download and reinstall the Kodi app or update every 7 day if you have a free Apple ID
- Connect your iOS device to your Mac and launch Xcode.
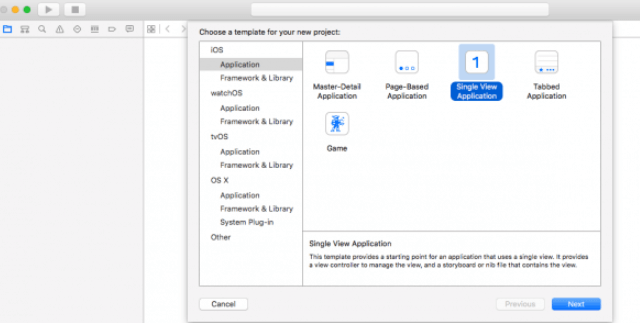
- Now, click on “Create a new Xcode project.”
- You’ll receive different options, click on “Application”, and then select “Single View Application”, and then on “Next.”
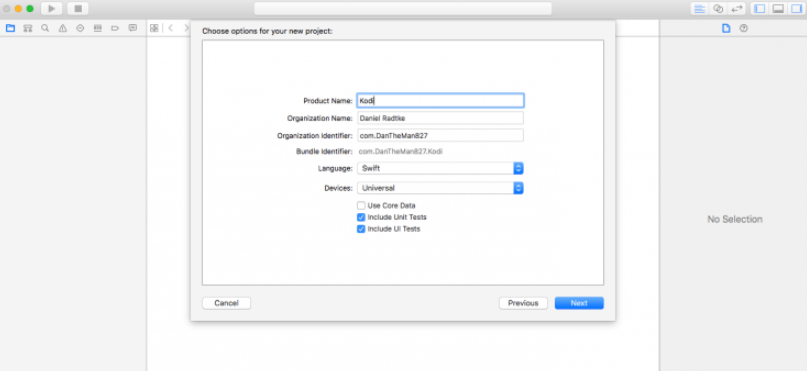
- You’ll receive a new dialog box. Once you see that, fill in a name and identifier. It can be under any name, for example, “Kodi” as shown in the sample image below. Then click on “Universal” and then on “Next.”
- Choose a location for your new repository and save it on your desktop for later. Next, click on “Create.”
- Now, you’ll receive another dialogue box of Xcode, with a message that says “No code signing identities found.” Click on “Fix Issue.”
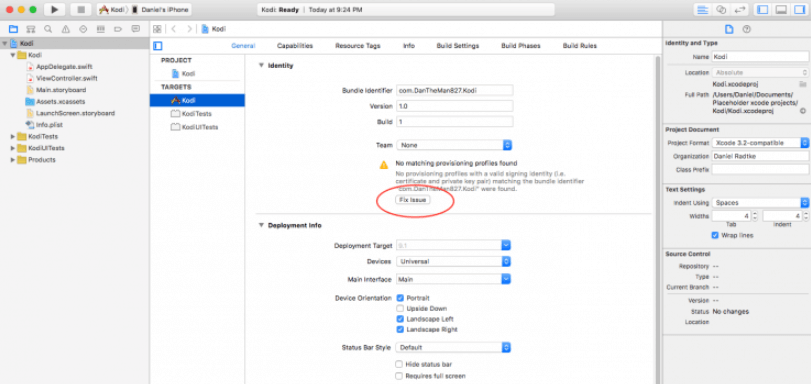
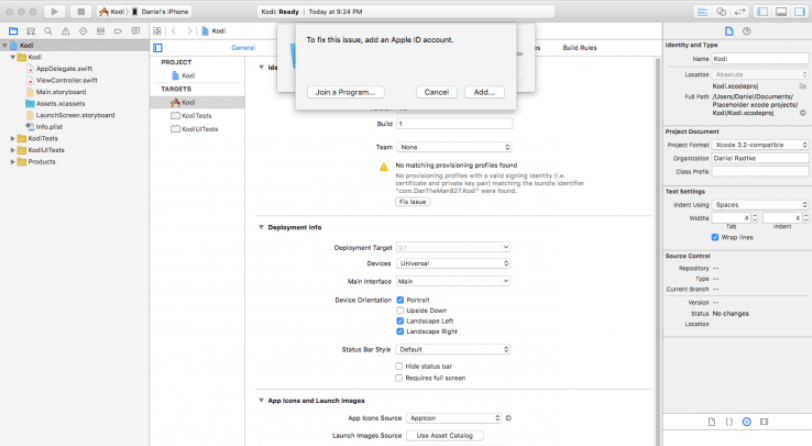
- Next, you’ll be prompted to either create or sign into your free dev Apple ID account. So, fill in your credentials or enter them to sign in.
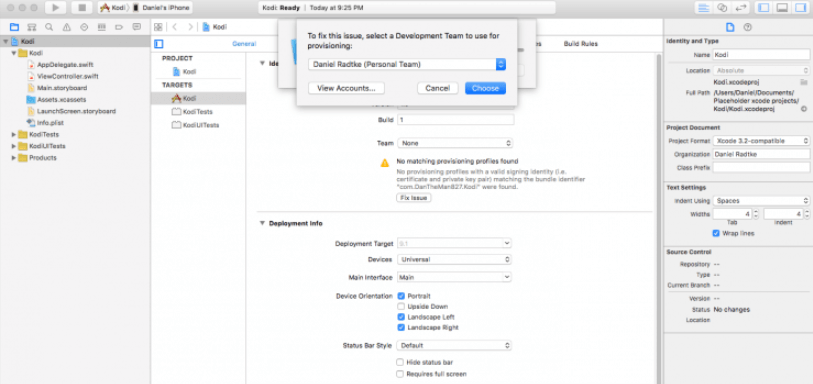
- Then, proceed by selecting your Development Team. By default, you’ll already have one team to select. When you click on that, Xcode will fix the errors.
- Now, launch the iOS App Signer and select the “Signing Certificate” and the “Provisioning Profile.” You can fill in the name Kodi in the “App Display Name” tab. In this way when you’re done installing and updating the Kodi app, that app will appear under the same name.
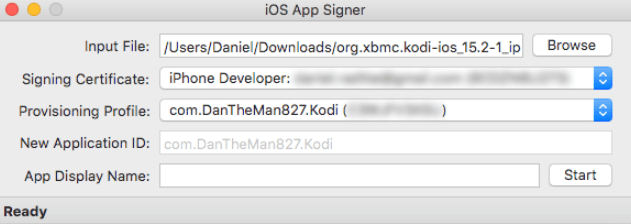
- Click on “Start” once you’re done filling everything in.
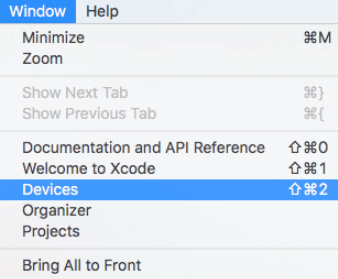
- Head back to Xcode, and click on the “Window” menu and select “Devices.”
- On your iOS device, you’ll see a side-menu and some information about your device in the center screen. On the same screen, you’ll see a plus sign at the bottom left corner. Click on it. Here’s a sample:
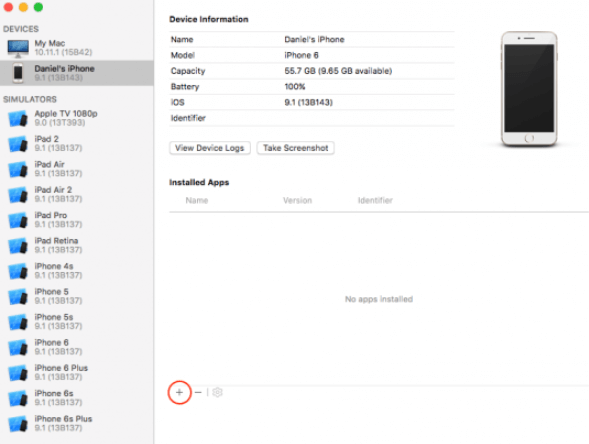
- When you find the updated and installed app on your computer, click on “Open.” Your app will now be found under the folder of “Installed Apps.”
- Lastly, disconnect the cables, and on your iOS Settings, go to “General”, then on “Profiles & Device Management” and then verify “Apple ID” you used for Xcode.
- Click on “trust” applications associated with this account.
- That’s all!
How to update Kodi on macOS
Kodi isn’t readily available on the Mac App Store. However, you’ll be able to easily get the Kodi download and updates from the official Kodi website.
You start by:
- Heading to the Kodi official website.
- Over there you’ll find a download page for various devices.
- Download Kodi for macOS.
- Select the “INSTALLER (64BIT)” version
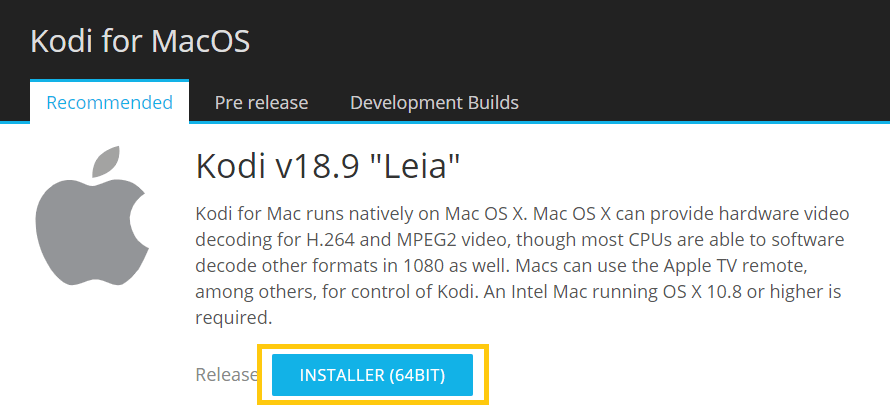
- The latest Kodi DMG file will begin to download
- Once the installer file is downloaded, open it, and click on the “Applications” folder.
- Then press “CMD+V” into the Application folder.
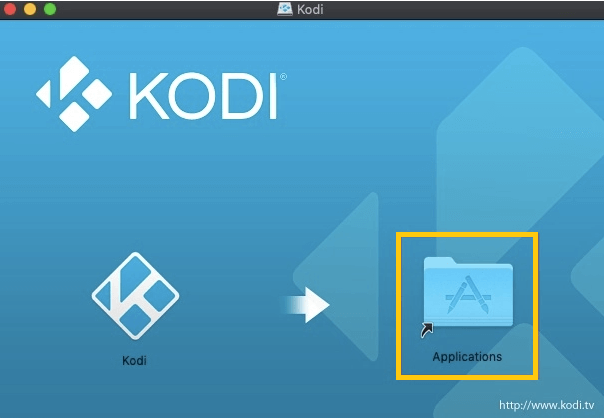
- Since you’ll be replacing the older Kodi app, you’ll be prompted with a dialogue box asking whether you’d like to replace the older version. Click on “Replace.”

- That’s all! You now have your updated Kodi Leia 18.9 on your macOS.
How to update Kodi on Xbox One (S and X)
The steps for this is fairly simple to follow and in fact doesn’t take much time. In general, Xbox usually updates all apps and games automatically. However, to ensure that the updating process is smooth, you should run the update manually.
Start by:
- On your Xbox control, press the Xbox button to launch the main screen on your Smart TV.
- Click on “My Games & Apps” or head to the Microsoft Store if you haven’t already downloaded the Kodi app.
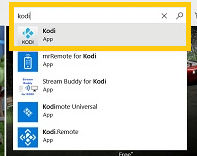
- You’ll see an option by “Updates” on the left side of the screen. Click on it.
- If you have the older version of Kodi, you should see the latest Leia 18.9 update available.
- Proceed to download and then install it.
- That’s about it!
How to update Kodi (Leia 18.9) on Linux
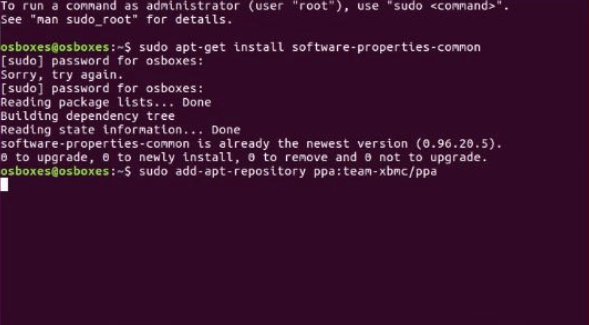
The procedure to download the updated Kodi version or any other app on Linux operating system is always a little different from the other tutorials on this blog. It involves inputting a series of commands.
Here’s what you should do to update Kodi to version Leia 18.9 on Linux:
- Run the Terminal interface by pressing the keys “CTRL+ALT+T”
- Start with the first command “sudo apt-get install software-properties-common” and hit on the enter key.
- Then input the second command, “sudo add-apt-repository ppa:team-xbmc/ppa”
- Next, enter the third command, “sudo apt-get update”
- Lastly, add the last command, “sudo apt-get install kodi”
That’s about it!
To conclude
You now know how to update Kodi on multiple devices. Just remember that apart from the instructions given for each tutorial, you must use a VPN. Kodi, as mentioned above is a third-party app, and needs ample online security while being used.

